Drawings of Lions Drawings of Lions Easy
One of my absolute favourite animals to draw is a Lion. I love creating the long flowing manes and the bright, fierce eyes. But lions can be a very difficult and challenging subject to draw.
Which is why I decided to share with you my approach for how to draw a realistic lion
We are going to cover the basic step by step approach that I follow when drawing a realistic lion. Then in I will be sharing my process for turning that basic drawing into a finished work of art.
We will start with a simple tutorial showing how to draw a lion's head. We'll begin with the basic shapes then move on to more detailed work.
For beginners just starting out I recommend starting with a 2H a pencil and paper then moving on to darker B-8B pencils in the later drawing stages.
I also recommend only pressing very lightly with your pencil at the start so that you can easily erase the construction lines when you have finished.
How to Draw a Realistic Lion
- Sketch in the basic shapes of the lions head.
- Draw in the facial features
- Add the eyes just above the mid point of the head.
- Make the nose slightly smaller than the gap between the eyes
- Add details such as pupils and hanging corners of the mouth.
- Refine the drawing to make it flow
- Draw the fur as clumps not individual hairs
- Draw the clumps in slightly different sizes, shapes and directions
Sketch in the basic shapes
When I draw a lion I always start my simple drawings with a cross. This lets me understand the perspective and place the eye line and mid-point of the lion's head. This is done by drawing a vertical line in the middle of your page then a horizontal line around one third from the top of the first line.

Draw a circle around the point where the two lines cross. This is going to become your lion's face. You don't want the circle two big. Roughly half the length of the horizontal line.

Next the ears. Draw two smaller circles on top of the first. These should be slightly smaller than one of the quarters of the main circle. It doesn't matter if these aren't perfectly in line. Your drawing will actually look better if it isn't completely symmetrical.

Next draw two even smaller circles roughly half the size of the ears towards the bottom of the face. They should slightly overlap with the bottom of the face circle.
They should be roughly 2 thirds the length of each half of the face. This is going to form the muzzle or part of the mouth.

Next we want to add the bottom jaw. To do this add a half circle below the circles you have just draw. This should be slightly smaller than the length of the two circles added together.

Once you have done this connect the bottom half circle to the large circle by drawing two diagonal lines.

Next very lightly draw two diagonal lines from the centre point to the edges of the two circles that you drew for the muzzle to form a triangle shape. This will form the lion's snout.

Sketch in the mane by drawing a curved line connecting the tops of the ears and another larger curved line that connects the bottom of the ears going all the way to the bottom of your vertical line. The further away from the bottom jaw you go the longer your mane will be.

Now you have the basic structure of a lion's head.
Drawing in the Facial Features
Once we have drawn the basic features in the next set of steps you may wish to erase some of the basic lines you have created in the previous steps to stop your drawing looking too messy.
The eyes
Start with the eyes. On the horizontal line mark where the mid-point of each half of the face is. Slightly above the horizontal line draw a small circle on each side of the face. This will be your eyeball.
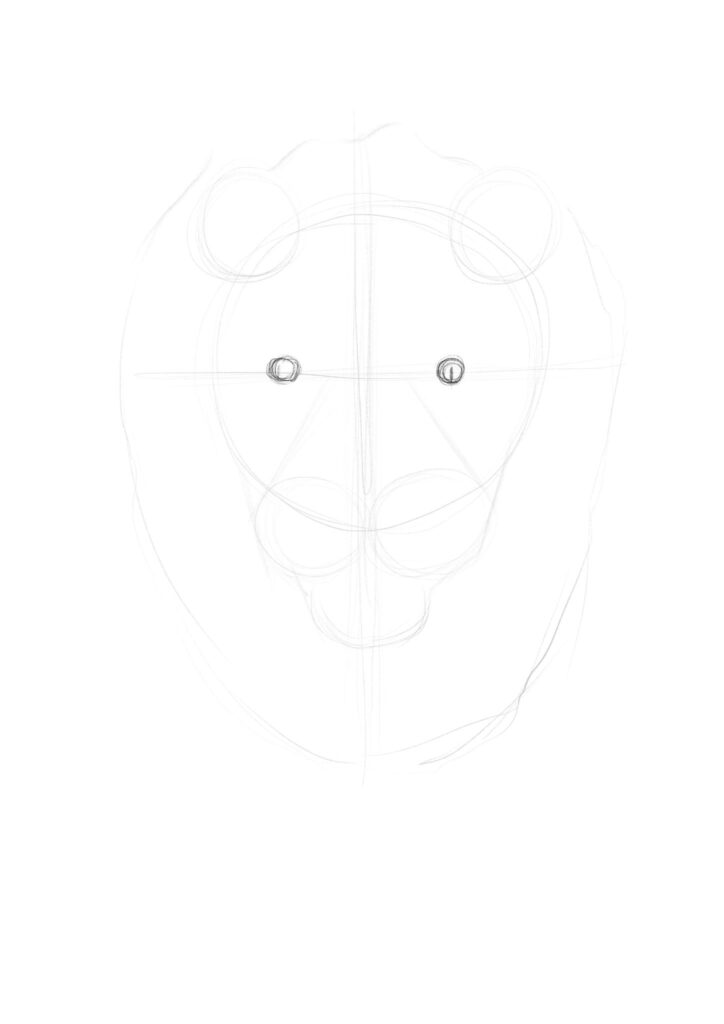
Around your eyeball you should draw this ellipses shape similar to the image shown here. Make sure the edge closest to the middle of the face is the longest.

A tip for getting the right proportions for the eyes is that the whole eye should be roughly one fifth the length of the face. The gap between the eyes and both gaps on either side of the eyes should all be roughly that same size too.
The nose
You already have a great starting point for the nose.
Draw a squashed heart shape from the point where the two muzzle circles meet at the bottom to the top of each circle. Then give your squashed heart some arms that reach roughly to where each circle crosses the large face circle.

On the outside of these arms draw two small outwardly curving lines like this.

From the inside corner of each eye draw two slightly outwardly curving lines to the edge of the muzzle circles.

Next draw two smaller curved lines around the inside edges of the eyes as seen in the picture.
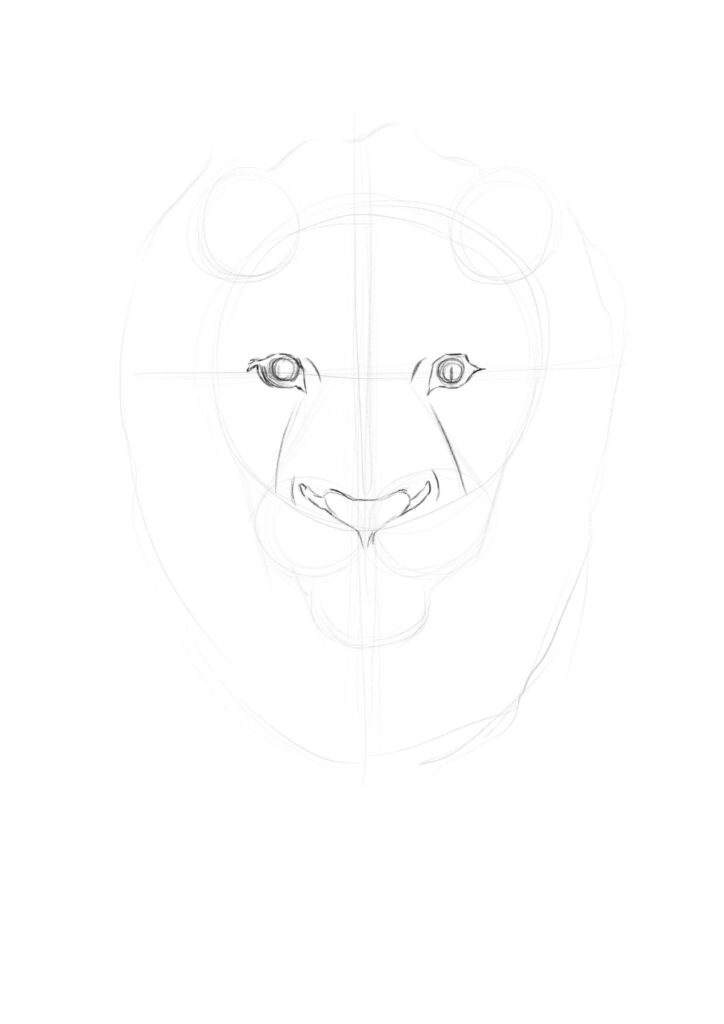
From the bottom of these lines draw two larger curved lines that meet the small lines at the side of the nose.

The rest of the face and mane
Next add some cheekbones going from the outside corner of the eyes to roughly the edge of the nose but make sure you don't cross that big outward curving line you have just drawn.

Finally refine the shape of the ears, head and mouth slightly. This is to make the drawing flow and appear more natural. Copy the steps from the image below. You can then erase the construction lines until you are left with a basic drawing of a lion.

We still don't want to be pressing very hard as we still need to add more details to the drawing.

Adding the details
Again start with the eyes. Add a smaller circle inside each eye for the pupil and an even smaller circle inside that for the reflection. Make sure the reflection is on the same side for each eye. So both on the right or both on the left.

Split your eye in half to show the shaded area at the top of the eye.
Above and below the eye you need to add curves that rough follow the same shape to show the upper and lower parts of the eye lids and socket.

The Nose
For the nose add the large Y shape with a line running through the centre forming the ridge in the centre of the nose.
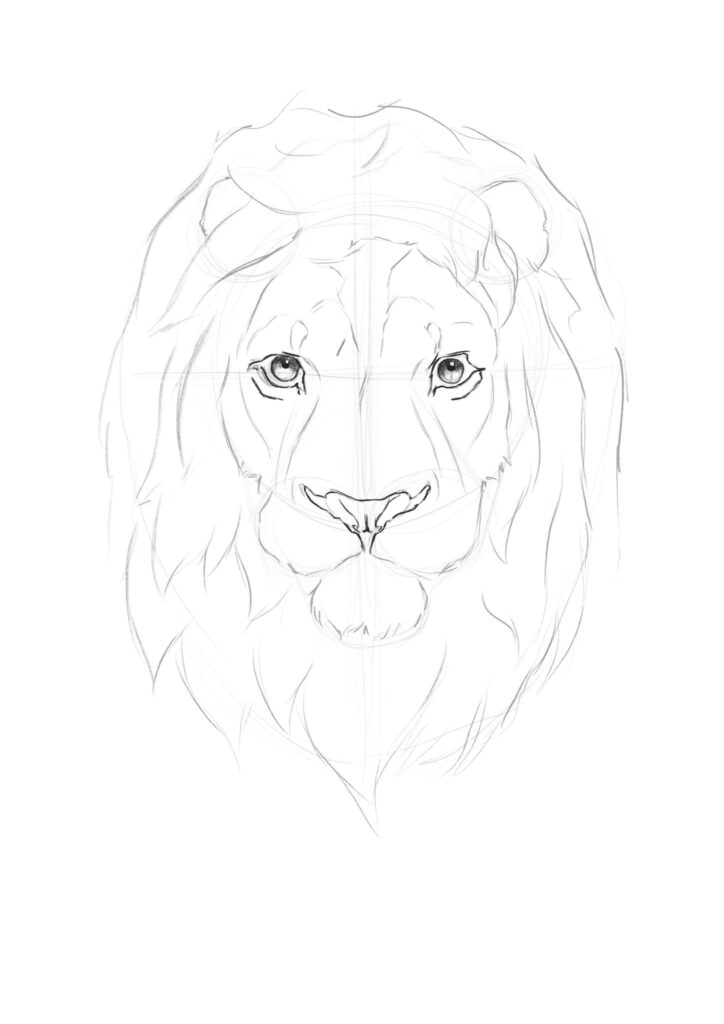
The Ears
Next the ears need two smaller lines on the inside of each ear roughly following the shape of the curve.

The Mouth
Two smaller curved lines can be added to each corner of the mouth. This is to give the appearance of the mouth hanging down slightly.

Finishing the drawing
This is where you can press down a little harder with your pencil or switch to a darker / softer one. You can add shading to the eyes, nose and mouth before adding the fur.

Add fur to the chin and the top of the head. These can be done with very few lines draw your fur as clumps rather than trying to draw individual hairs.
To make it more interesting and real make sure that each clump is a slightly different size, shape and curves in a slightly different direction. Variation is what makes things look natural.

The Mane of the lion
For the mane use longer lines. This is where the longest hairs are. Again draw the hairs as clumps and again vary the size and direction of each clump slightly.
The hair around the bottom of the mane will be slightly longer than the hair near the top so make sure to draw longer lines for the bottom section of the mane.

Adding the Basic Whiskers to your lion
On the muzzle draw a few lines of dots for the whiskers to grow out of then draw the whiskers coming out of these.
Again make sure to slightly alter the length and curve of each of the whiskers to make it look more interesting and real.

Congratulations you have completed your basic how to draw a lion but this is not the end of the guide! Remember the more you practice the better you will get.
Soon you will be able to draw the lion very quickly without the need for the construction lines. You can progress to the next steps much more quickly
I left out the actual whiskers on the image above as I will be drawing the in with an eraser later so that they are white.
How to Draw a lion and make it Realistic
Now we want to make the lion look alive. To do this we need to add shading and fur texture.
To start with I identify the darker regions of the face and shade using a dark pencil or charcoal. I am still not pressing very hard as I want to be able to blend these marks later.

Next I cover the remaining areas with more pencil or charcoal and blend them together lightly with a tissue or blending stump.

I use even darker pencils or more charcoal depending on the medium. Use these to build up more darker areas around the cheekbones, eyes and mane to establish form.
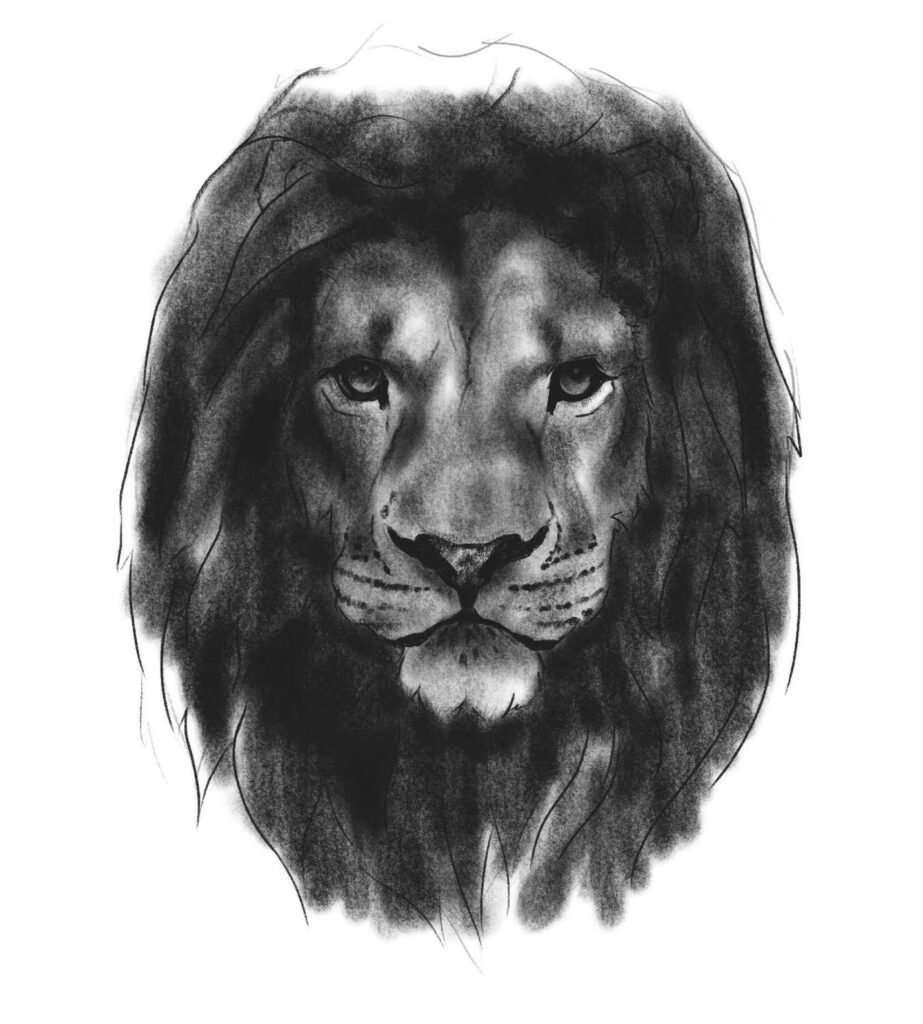
I like to also tone my background here using the same technique other wise it looks like the lion head is just floating in white space.

The Fur of a lion
For the fur texture I use a putty eraser to remove the charcoal or pencil from the surface of the paper. You can watch how I do that in this youtube video. You can do this with a regular eraser too.

I repeat the process for the remaining areas of the face and mane. removing longer strands for the main and shorter strands for the hair of the face.

I then work back over the top with the dark pencil to add the final areas of shadow all over the face and mane.

The Real Whiskers
Now it's time for the real whisker. I use a pencil eraser or a sharp regular eraser to draw in the lines of the whiskers. This could also be done with a white pen or paint if you wanted to.

I then like to make the drawing more expressive using abstract shapes and marks. You can finish on the step above.
I have included what the final drawing looked like for you to see.

THANK YOU FOR READING how to draw a lion
I have more full video tutorials on my Patreon channel make sure to go and join
Theres even more about Painting a lion's mane and more about the colours to use when painting a lion.
I hope the information about my process is useful and you can use it as a starting point on your way to creating incredible drawings in your own style.
Please tag @StudioWildlife_Art on Instagram and show me your artwork.
Follow our Studio Wildlife Pinterest page to see more examples of wildlife artwork created by some incredible wildlife artists!
Source: https://studiowildlife.com/how-to-draw-a-realistic-lion-like-an-artist/
0 Response to "Drawings of Lions Drawings of Lions Easy"
Post a Comment